
Paper Supplies
white paper for base (cut to 8-1/4" x 5-7/8")
white paper strips (cut to 4-1/8" x 1")
red strips (cut to 4-1/8" x 1-1/2")
red stripe (cut to 4-1/8" x 5-7/8") - I used Simple Stories Sn@p! Red Dot/Stripe
Transparency film (cut to 4-1/2" x 3-3/4")
Stamps
Merry Christmas sentiment of choice (I used the one from Hero Arts Cozy Moments set)
Inkadinkado Snowman
Ink
Staz On Black
Tools
Adhesive
Pop-Dots
Glitter Glue
Colored Pencils (Red & Blue)
Oval Cutter
Paper Cutter
Paper Scorer
Bone folder
Stamp-a-ma-jig stamp positioner

Stamp your "Christmas" sentiment on the 4-1/8" x 1" white strip. Then adhere to 4-1/8" x 1-1/2" red strip.
 | |
| For this step, you will need your Black Staz On Ink, the 4-1/8"x1" white strip, and your Christmas sentiment. |

Using your oval cutter, cut an oval out of the 4-1/8" x 5-7/8" red strip paper. I used the Creative Memories 3" x 3-7/8" oval with the red blade. Cut oval closer to the top, so you have some space on the bottom of the card.

Score white card base. DO NOT FOLD yet.
Step 4
Align red striped paper on right side of card base so corners line up. Ink stamp, align stamp in center of oval and stamp your image.
 |
| Step 4: transparency film, black Staz On Ink, snowman stamp, stamp positioner, white card base, and red striped paper with oval cut out. |

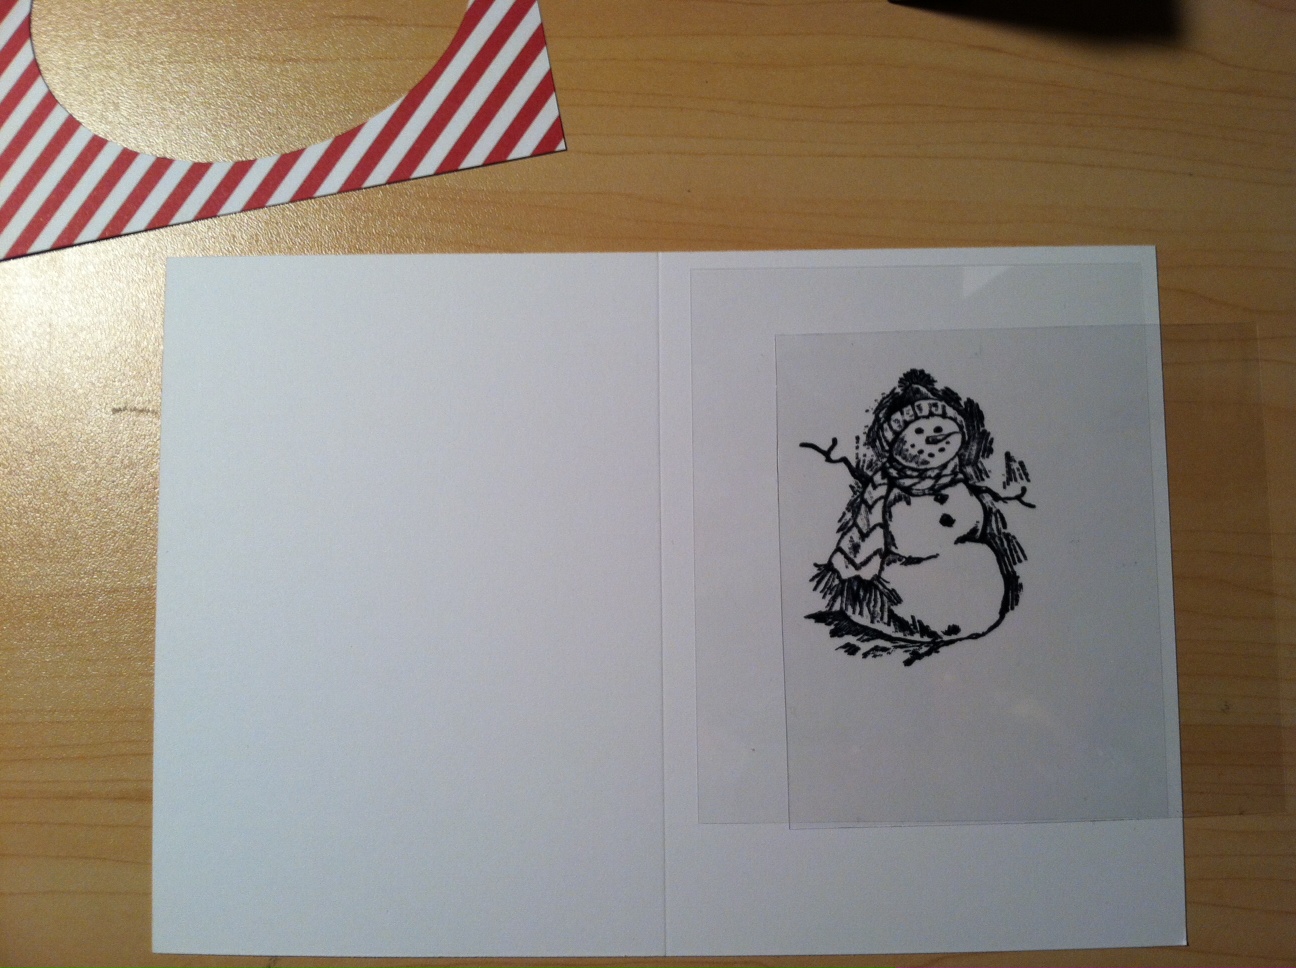
Step 5
Stamp the snowman on a piece of transparency (this is to use for positioning only). This one will be easier to show the steps in pictures, so under each picture is what you need to do.
 |
| Align your transparency film over the snowman image on the white card base. |
 |
| Align positioner image over top of card base and clean transparency film. Align positioner to top left edge of positioning image. |
 |
| Once you've aligned the stamp positioner in place, remove positioning image. |
 |
| Ink stamp, stamp image, aligning corner of stamp to stamp positioner. This helps ensure your two images will line up. |
 |
| You should have your snowman stamped on the transparency film and the main card base. |
Color parts of the scarf and hat red (I colored in every other stripe in the scarf and hat). Color the shadowy areas blue.
 |
| Step 6: colored pencils and the main card base. |

Step 7
Adhere the transparency film to the red striped paper by aligning the transparency film over the card base image. Apply adhesive to the edges of the transparency film, attach red striped paper on top of transparency film. Make sure the corners of your card base and the corners of the red striped paper line up.
 |
| Step 7: adhesive, the card base, the snowman on transparency film and the red striped paper with the oval cut out. |

Step 8
 |
| Step 8: Adhesive, pop dots, Christmas sentiment, red striped paper with snowman on transparency film, and the card base. |
Adhere your Christmas sentiment to the front of the striped paper, covering part of the bottom of the oval. Flip over, attach your pop dots to the backside of the red striped paper. Flip right side up, align corners of the red striped paper with the card base and attach.

Step 9
Add glitter glue to transparency film over areas colored blue. Let dry
 |
| Step 9: glitter glue, completed card. |


Hope you enjoyed yet another Christmas card tutorial. If you have any
thoughts or suggestions on how to improve this how-to, please leave your
comments. I'd love to hear your feedback.